Sofia had a problem: 200 saved kitchen photos and zero actual cabinets ordered.
She and her husband Leo had decided to tackle a modest remodel - kitchen and living room, nothing wild. But every time they talked finishes, it turned into this:
- Sofia: “I just want it to feel airy and calm.”
- Leo: “I just want it to not fall apart in five years.”
- Both: “Wait, which tile did we like again?”
Their contractor kept asking, “Do you have a mood board?” They had six. None of them agreed. That’s when their friend suggested, “Make one vision board for the way you want to live in the space, not just how you want it to look.”
So they opened a LunaBoard and named it: “How Home Feels After Reno.”
Step 1: Define the Feel Before the Finishes
Instead of starting with colors, they started with sentences.
At the top of the board, they added:
- “Words for Our New Kitchen”
- “Words for Our New Living Room”
Under the kitchen:
- “Light, forgiving, not precious”
- “Easy to clean after Leo’s 400 cooking experiments”
- “Enough space for friends to help without bumping into each other”
Under the living room:
- “Cozy but not cluttered”
- “Where we actually want to sit, not just where the TV fits”
- “Plants, but not jungle-choking-the-couch plants”
Then Sofia added photos - not just of magazine kitchens, but of:
- Their current space on a good-light day
- A dinner party they’d hosted where everyone crammed around the tiny table
- A corner where the dog always napped in a sun patch
They were designing for that life, not a catalog.
Step 2: Build One Clear “Look & Live” Board for the Contractor
They created two main regions:
- “Kitchen - Look & Live”
- “Living Room - Look & Live”
In the kitchen area, they dropped:
- 3 - 5 cabinet examples (not 30)
- Two countertop options
- One or two backsplash ideas
- Images of flooring they liked
Next to those, they added:
- A text block: “We cook a lot. Needs to hide tomato sauce accidents.”
- Photos of open shelving vs. closed cabinets, with heart or 🚫 reactions
For the living room, they did the same:
- Sofa styles
- Rug options
- Lighting inspiration
- A photo of a real-life layout similar to their room
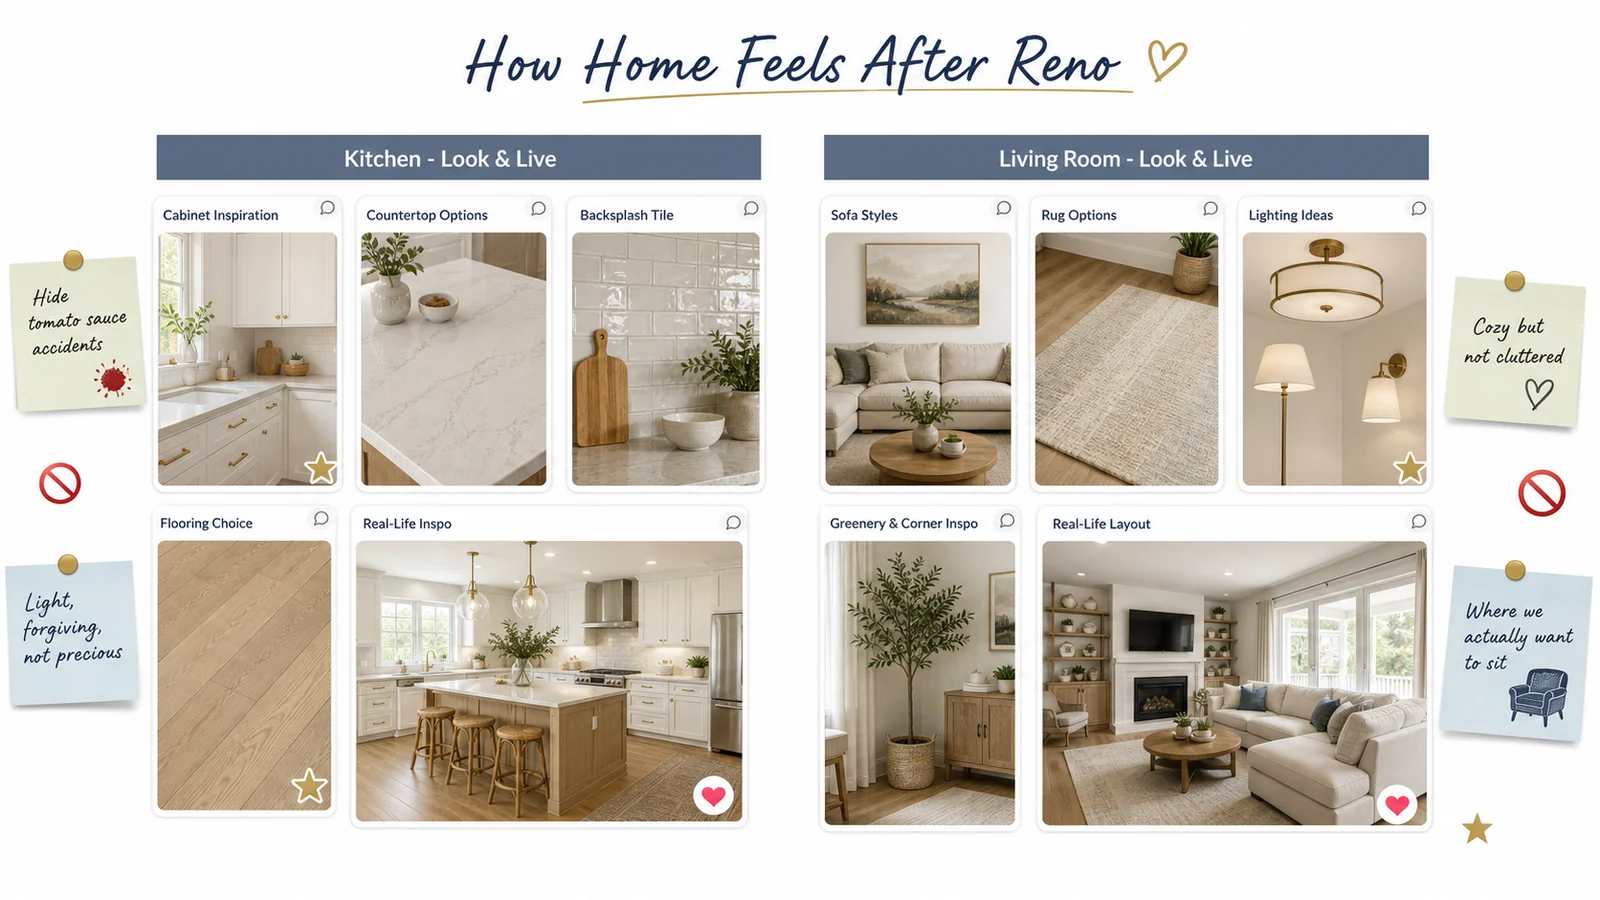
This became the board they shared with their contractor: not overwhelming, but specific.
Step 3: Use the Vision Board to Test Combinations
Instead of trusting their imagination, they used the board like a design sandbox.
- They placed one cabinet image next to one countertop and one backsplash.
- Then duplicated the trio with a different backsplash.
- Then swapped in the other countertop.
Suddenly, they could see which combinations made their hearts relax versus which looked like a Pinterest kitchen that didn’t belong to them.
When something felt off, they added a note:
- “Too sterile”
- “Pretty but stressful to keep clean”
- “Love this, but feels like someone else’s house”
They dragged those into a “Pretty But Not Us” section.
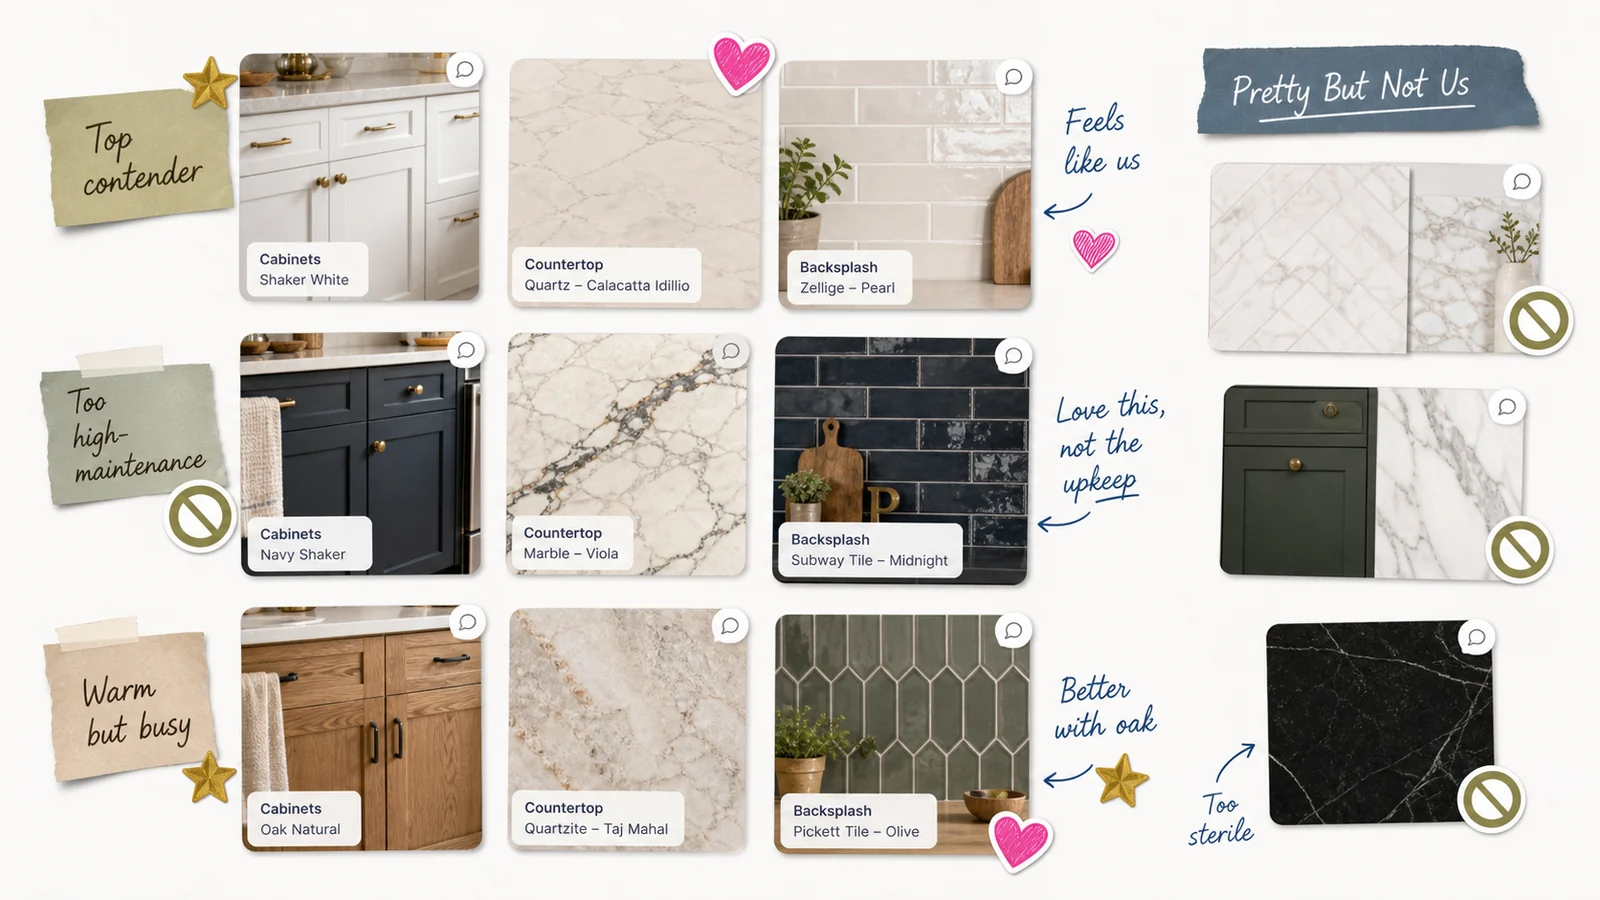
The contractor loved it. “This saves about 10 emails,” he said.
Step 4: Track Decisions and Budget in the Same Space
On the right side, they added a simple “Decisions” column.
Each card had:
- The item (“Cabinets,” “Countertops,” “Sofa”)
- Final choice (brand/style)
- Price
- Status: Researching / Ordered / Installed
Sofia attached product links and receipts to each card. Leo added brief notes:
- “Found cheaper option with same look”
- “Backordered, need Plan B”
Whenever something moved to “Ordered,” they added a big gold star sticker on the corresponding image in the “Look & Live” section.

Their budget spreadsheet still existed - but the board told the emotional story of progress.
Step 5: Keep the Board Updated as Reality Hits
Reality, of course, did its thing.
- The dream tile was discontinued.
- The sofa they wanted would have taken six months to arrive.
- The paint color they loved in a photo looked green in their actual light.
Each time, instead of spiraling, they:
- Added the new constraints to the board (“Tile discontinued; need similar but warmer tone”).
- Pulled in 2 - 3 alternatives.
- Left comments like, “This one still feels calm, even if it’s not the exact inspo pic.”
They also added a section called “Little Joys,” where they:
- Dropped a photo of their first dinner in the half-finished kitchen
- Saved a picture of the dog immediately claiming the new rug
- Wrote “First movie night with friends” under a snapshot of the living room mid-reno
The board held the mess and the magic.
Frequently Asked Questions
What’s the difference between a mood board and a home vision board?
A mood board usually focuses on how a space should look. A vision board blends look + feel - how you want to live in the space - and becomes a communication tool for you, your partner, and your contractor.
How many inspo images should we keep on the board?
Enough to show patterns, not so many that nothing stands out. Aim for 3 - 5 solid examples per element (cabinets, sofa, etc.). Move everything else to a “Pretty But Not Us” area so it stops muddying the waters.
Can we share the same board with our contractor?
Yes, and it’s often helpful. Keep one “client-facing” area clean and clear with final choices and a simple note about how you plan to use the space. You can keep your messier experimentation area separate or on a duplicated board.
What if my partner and I have totally different styles?
Use the board to find overlap. Create “Their Picks,” “My Picks,” and “Our Overlap” sections. You might discover that, for example, you both like warm wood and hate high-gloss finishes - even if your initial examples looked very different.
Conclusion & Gentle Next Step
Sofia and Leo’s finished rooms didn’t look exactly like her first pins or his first sketches. They looked like a home that made sense for the way they actually lived - and that they’d chosen on purpose, together.
If your remodel ideas are stuck in a hundred tabs and even more arguments, try putting them on one calm, visual canvas. Start a renovation vision board in LunaBoard and let it hold your “look,” your “feel,” and your reality in one place.